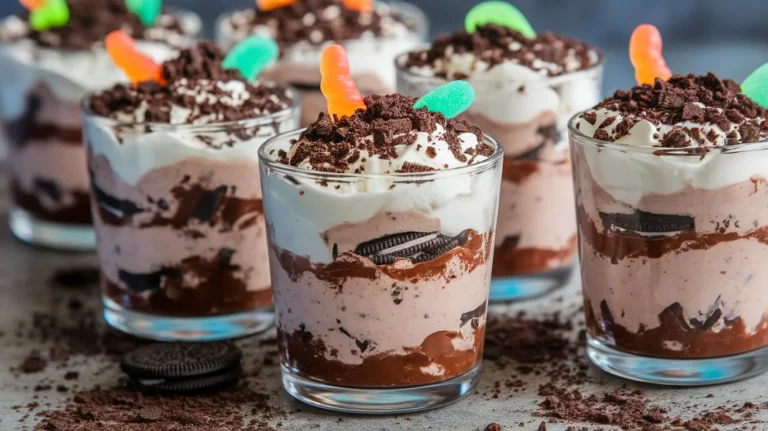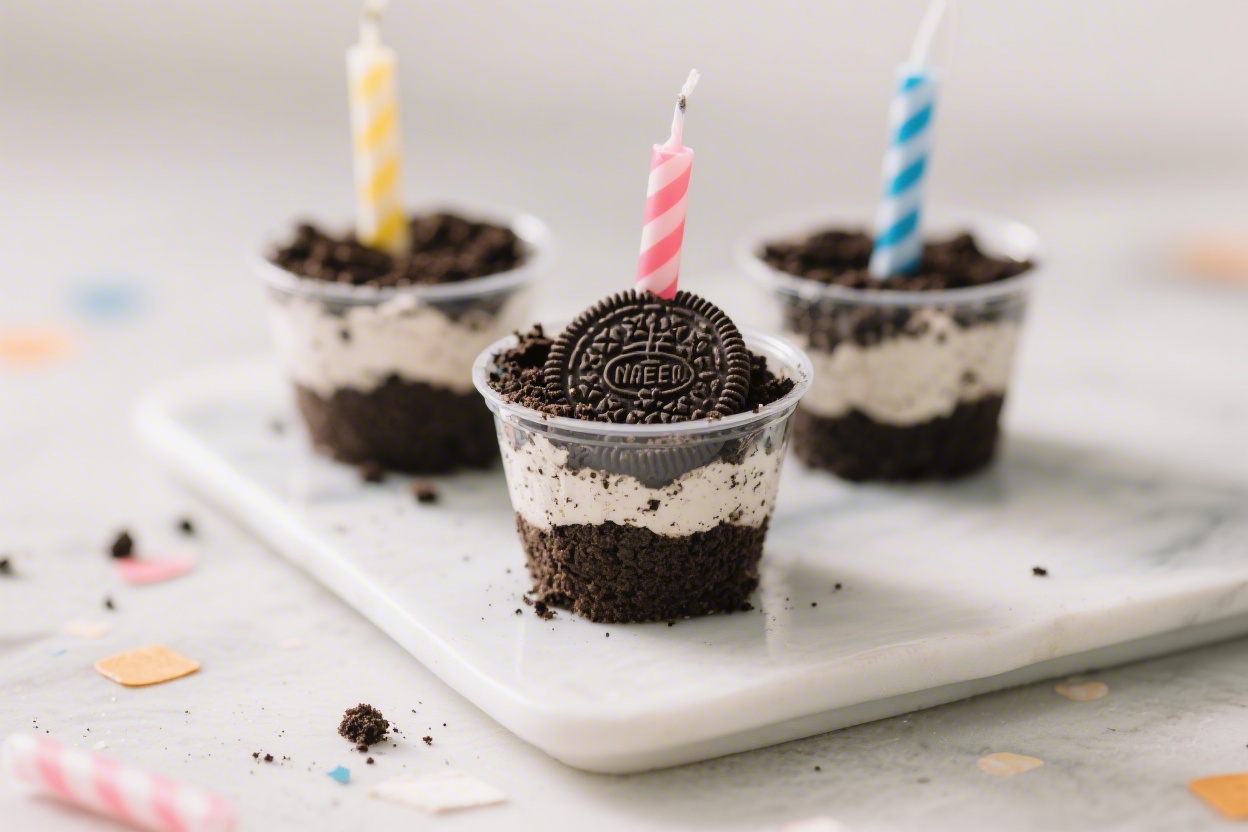
Mini Oreo Dirt Cups for Birthdays and Celebrations – A Fun, Crowd-Pleasing Treat
Mini Oreo dirt cups bring instant joy to any birthday table or celebration spread. They’re playful, nostalgic, and ridiculously easy to put together. Kids love the “dirt and worms” vibe, and adults appreciate the creamy layers and crunch.
You can batch them ahead, customize the toppings, and serve them in minutes. They look adorable, taste indulgent, and don’t require baking or special skills.

Mini Oreo Dirt Cups for Birthdays and Celebrations – A Fun, Crowd-Pleasing Treat
Ingredients
- Oreo cookies (about 24–30 for 10–12 mini cups), crushed into fine crumbs
- Instant chocolate pudding mix (two 3.9 oz boxes) or one large box
- Cold milk (per pudding package instructions, usually 4 cups total)
- Cream cheese (8 oz, softened)
- Powdered sugar (1/2 cup, to sweeten the cream cheese layer)
- Vanilla extract (1 teaspoon)
- Whipped topping (8–12 oz tub) or fresh whipped cream
- Mini plastic cups or small glass jars (2–4 oz size)
- Gummy worms or gummy bugs (optional, for decoration)
- Fresh berries or mint leaves (optional, for a lighter twist)
Instructions
- Crush the Oreos. Place the cookies in a zip-top bag and use a rolling pin to crush until fine. You want a crumbly “soil” texture with a few small bits for crunch. Set aside.
- Make the pudding. In a large bowl, whisk the instant chocolate pudding mix with cold milk per package directions. Let it thicken for 5 minutes in the fridge.
- Whip the cream cheese layer. In a separate bowl, beat softened cream cheese, powdered sugar, and vanilla until smooth and fluffy. Fold in half of the whipped topping to create a light, creamy layer.
- Prep your cups. Line up your mini cups on a tray. This makes assembly tidy and fast, especially if you’re doing a big batch.
- Add the base layer. Spoon 1–2 teaspoons of Oreo crumbs into the bottom of each cup. Tap gently to level.
- Layer the cream cheese mixture. Add a small dollop (about 1 tablespoon) of the cream cheese layer over the crumbs. Smooth lightly with a small spoon.
- Add the pudding. Spoon in chocolate pudding (about 1–2 tablespoons) over the cream cheese layer. Keep the edges clean for a neat layered look.
- Top with “dirt.” Finish with another layer of Oreo crumbs to fully cover the pudding. Don’t pack it down too tightly—fluffy crumbs look more like soil.
- Decorate. Press a gummy worm into the top so it looks like it’s peeking out. For a fresh take, add a raspberry and a small mint leaf instead.
- Chill before serving. Refrigerate the cups for at least 1 hour so the flavors meld and the layers set. Keep chilled until party time.
- Optional final flourish. Right before serving, add a swirl of the remaining whipped topping on some cups for contrast and a bakery-style finish.
What Makes This Special
These mini cups are all about fun without the fuss. You get the texture contrast of smooth pudding, fluffy whipped cream, and crisp Oreo crumbs in every bite.
The portions are perfectly sized for parties, so guests can grab and mingle without juggling a plate and fork. Plus, there’s room to get creative. Add gummy worms for a kid-friendly twist, or swap in berries and mint for a more grown-up look.
What You’ll Need
- Oreo cookies (about 24–30 for 10–12 mini cups), crushed into fine crumbs
- Instant chocolate pudding mix (two 3.9 oz boxes) or one large box
- Cold milk (per pudding package instructions, usually 4 cups total)
- Cream cheese (8 oz, softened)
- Powdered sugar (1/2 cup, to sweeten the cream cheese layer)
- Vanilla extract (1 teaspoon)
- Whipped topping (8–12 oz tub) or fresh whipped cream
- Mini plastic cups or small glass jars (2–4 oz size)
- Gummy worms or gummy bugs (optional, for decoration)
- Fresh berries or mint leaves (optional, for a lighter twist)
Step-by-Step Instructions
- Crush the Oreos. Place the cookies in a zip-top bag and use a rolling pin to crush until fine.
You want a crumbly “soil” texture with a few small bits for crunch. Set aside.
- Make the pudding. In a large bowl, whisk the instant chocolate pudding mix with cold milk per package directions. Let it thicken for 5 minutes in the fridge.
- Whip the cream cheese layer. In a separate bowl, beat softened cream cheese, powdered sugar, and vanilla until smooth and fluffy.
Fold in half of the whipped topping to create a light, creamy layer.
- Prep your cups. Line up your mini cups on a tray. This makes assembly tidy and fast, especially if you’re doing a big batch.
- Add the base layer. Spoon 1–2 teaspoons of Oreo crumbs into the bottom of each cup. Tap gently to level.
- Layer the cream cheese mixture. Add a small dollop (about 1 tablespoon) of the cream cheese layer over the crumbs.
Smooth lightly with a small spoon.
- Add the pudding. Spoon in chocolate pudding (about 1–2 tablespoons) over the cream cheese layer. Keep the edges clean for a neat layered look.
- Top with “dirt.” Finish with another layer of Oreo crumbs to fully cover the pudding. Don’t pack it down too tightly—fluffy crumbs look more like soil.
- Decorate. Press a gummy worm into the top so it looks like it’s peeking out.
For a fresh take, add a raspberry and a small mint leaf instead.
- Chill before serving. Refrigerate the cups for at least 1 hour so the flavors meld and the layers set. Keep chilled until party time.
- Optional final flourish. Right before serving, add a swirl of the remaining whipped topping on some cups for contrast and a bakery-style finish.
Keeping It Fresh
These cups hold up well when made ahead. Cover the tray with plastic wrap or snap lids onto the jars and store in the fridge.
They’re best within 24–48 hours, while the crumbs are still pleasantly crisp on top. If you want maximum crunch, keep extra Oreo crumbs in a sealed bag and add them just before serving. Avoid leaving the cups at room temperature for long—2 hours max—especially if your party is outdoors.
Health Benefits
While these are a dessert-first treat, there are a few small upsides.
The dairy-based layers offer calcium and a bit of protein, especially if you use real whipped cream and milk. Portion-controlled cups also help with mindful indulgence—you get sweetness without committing to a giant slice of cake. If you choose berries as a topping, you’ll add antioxidants and fiber.
For a slightly lighter version, use reduced-fat cream cheese, light whipped topping, or a lower-sugar pudding mix.
Pitfalls to Watch Out For
- Watery pudding: Use cold milk and measure carefully. Warm milk or guesswork can make the pudding loose and messy.
- Gritty cream cheese: Make sure the cream cheese is fully softened before beating. Cold blocks lead to lumps.
- Soggy crumbs: Don’t assemble too far in advance.
The longer they sit, the softer the cookie layer becomes.
- Overfilling: Mini cups fill up fast. Leave a little headspace so toppings don’t spill over.
- Allergen surprises: Oreos contain wheat and may be processed in facilities with allergens. Double-check labels for guests with sensitivities.
Alternatives
- Flavor switch: Try vanilla or cookies-and-cream pudding.
You can also layer chocolate and vanilla for a swirled look.
- Gluten-free: Use gluten-free chocolate sandwich cookies and confirm your pudding mix is gluten-free.
- Dairy-free: Choose dairy-free pudding made with plant-based milk, a dairy-free whipped topping, and a vegan cream cheese.
- Fruit-forward: Replace gummy worms with sliced strawberries, blueberries, or cherries. Add a tiny mint sprig for color.
- Crunch boost: Mix in mini chocolate chips, crushed pretzels, or chopped peanuts between layers for added texture.
- Birthday twist: Top with colorful sprinkles or edible glitter. Add a candle to a “guest of honor” cup.
- Big-batch style: Make it in a trifle dish and scoop into bowls.
Same layers, less individual assembly.
FAQ
Can I make these the night before?
Yes. Assemble the layers, cover tightly, and refrigerate. For best texture, add the final Oreo crumb layer or any gummy toppings just before serving.
What size cups work best?
Mini cups in the 2–4 oz range are ideal for parties.
They’re easy to hold and give the right bite-to-cream ratio without feeling heavy.
Can I skip the cream cheese layer?
You can. The dessert will be lighter and more pudding-forward. If you skip it, consider adding a little extra whipped topping for balance.
How do I crush Oreos without a mess?
Use a zip-top bag with most of the air pressed out.
Roll gently with a rolling pin or use a food processor with quick pulses until fine.
Will almond or oat milk work for instant pudding?
Some instant puddings set poorly with non-dairy milks. Look for a brand labeled as compatible with plant-based milk or use a cook-and-serve pudding that sets well with alternatives.
How many cups does this recipe make?
Plan on 10–12 mini cups, depending on cup size and how generously you layer. Double the ingredients for larger parties.
Can I freeze Oreo dirt cups?
Freezing isn’t ideal.
The pudding and whipped layers can separate as they thaw, and the crumbs lose their texture. Refrigeration is best.
How do I keep the layers neat?
Use small piping bags or zip-top bags with the corner snipped to pipe the cream cheese and pudding layers. Wipe the cup edges with a damp paper towel if needed.
Are there nut-free options?
This recipe is typically nut-free, but always check cookie and candy labels for cross-contamination warnings.
Avoid adding nut toppings if you’re serving a mixed crowd.
What can I use instead of gummy worms?
Try chocolate rocks, mini mushrooms made from halved marshmallows, or fresh raspberries. For a garden theme, tuck in a small mint “sprout.”
In Conclusion
Mini Oreo dirt cups are the kind of treat that makes birthdays and celebrations feel playful and easy. They’re simple to assemble, look festive in any setting, and offer a creamy-crunchy bite everyone loves.
Keep a batch chilled, bring them out when the candles get lit, and watch the smiles roll in. With a few smart tweaks, you can match any theme, diet, or flavor mood—and still get that classic, crowd-pleasing magic.
Printable Recipe Card
Want just the essential recipe details without scrolling through the article? Get our printable recipe card with just the ingredients and instructions.