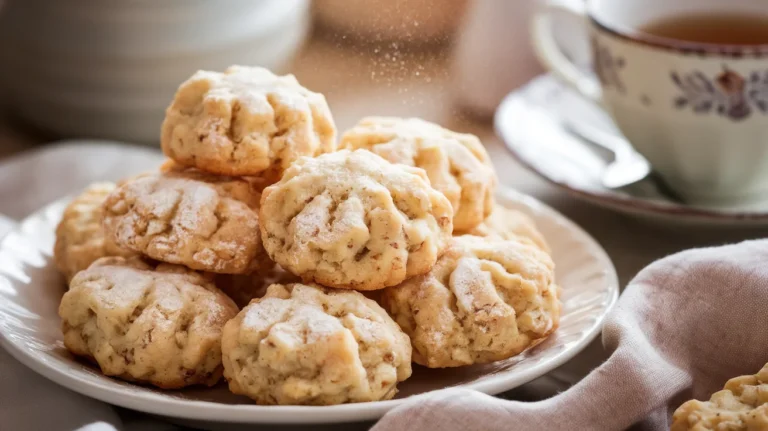
Festive Christmas Cookies with Green and White Icing
So you’re craving something cute, delicious, and Christmas-level adorable but don’t want to spend three days covered in flour and existential dread? Same.
That’s why these Festive Christmas Cookies with Green and White Icing are basically my holiday love language. They’re fun, they’re buttery, they’re iced like they’re about to walk the runway at Santa’s Fashion Week—and the best part? They’re easy enough that even your most “I only cook in the microwave” friend can pull them off.
Why This Recipe is Awesome
First of all, these cookies look like they were handcrafted by an elf with a Pinterest addiction. They’re crisp at the edges, soft in the middle, and cute enough to make your cookie tray look like it tried harder than you did.
Second, the recipe is idiot-proof. Like, “I didn’t mess it up and I once burned water” level simple.
Third, the green and white icing gives you that perfect Christmas vibe without needing a whole art degree in cookie decorating. If you can drag a spoon across icing, congrats—you’re basically a pastry chef now.
Ingredients You’ll Need
For the Cookies
- 2 ¾ cups all-purpose flour (the basic hero)
- 1 teaspoon baking soda (the lift-giver)
- ½ teaspoon baking powder (the backup lift-giver)
- 1 cup unsalted butter, softened (don’t use cold butter unless chaos is your brand)
- 1 ½ cups granulated sugar (the sweet stuff)
- 1 large egg (preferably not dropped on the floor first)
- 2 teaspoons vanilla extract (because cookies without vanilla are just sadness)
- ½ teaspoon salt (balances everything like a tiny therapist)
For the Green & White Icing
- 2 cups powdered sugar
- 2–3 tablespoons milk
- 1 teaspoon vanilla extract
- Green gel food coloring (go festive, not radioactive)
- Optional: Sprinkles, edible glitter, or whatever gives you joy
Step-by-Step Instructions
- Preheat the oven to 180°C (350°F).
Yes, you actually have to preheat. No, you can’t put the cookies in a cold oven “to save time.” That’s not how science works. - Whisk your dry ingredients.
Grab a bowl and mix the flour, baking soda, baking powder, and salt. Boom—dry team ready. - Cream the butter and sugar.
Use a mixer and beat until it looks pale, fluffy, and like it had a full night’s sleep. - Add the egg and vanilla.
Mix until smooth. Try not to eat it yet. (I mean, I won’t tell if you do, but… eggs.) - Combine wet and dry ingredients.
Add the dry mix in gradually. Stop when it forms a soft dough—don’t overmix unless you enjoy tough cookies. - Shape the cookies.
Roll spoonfuls of dough into balls, place on a baking sheet, and gently flatten the tops with your palm like you’re asserting dominance. - Bake for 8–10 minutes.
Pull them out when the edges barely start to brown. If they look fully done, you’ve gone too far. - Cool completely.
If you ice warm cookies, the icing will slide off like it’s abandoning you. Let them cool. - Make the icing.
Mix powdered sugar, milk, and vanilla. Divide it in two bowls and tint one festive green. - Decorate like the Christmas icon you are.
Drizzle, pipe, swirl—however fancy or chaotic you feel today. Add sprinkles for ✨drama✨.
Nutritional Facts
| Nutrient | Approx. Amount per Cookie |
|---|---|
| Calories | 145 kcal |
| Carbohydrates | 22 g |
| Protein | 1.5 g |
| Fat | 6 g |
| Saturated Fat | 3.8 g |
| Sugar | 14 g |
| Sodium | 95 mg |
| Fiber | 0.3 g |
These cookies are obviously a treat, not a kale smoothie—but hey, it’s the holidays. The butter gives you that rich texture your soul needs, and the sugar… well, it’s sugar. Think of these as edible joy boosters. And honestly, IMO, life’s too short to skip Christmas cookies.
Common Mistakes to Avoid
- Not softening your butter. Unless you enjoy wrestling with chunks of butter in your dough.
- Skipping the preheat. Rookie mistake. Don’t do it. Your cookies deserve better.
- Overbaking. If they look done in the oven, they’re already overcooked. Cookies firm up as they cool—trust the process.
- Using liquid food coloring. It makes icing runnier than your patience during holiday shopping. Stick to gel.
- Icing warm cookies. Instant icing meltdown. And not the cute kind.
Alternatives & Substitutions
- No vanilla? Use almond extract for a fun twist. It tastes like Christmas in a bottle.
- No food coloring? Leave the icing white and add colorful sprinkles. Easy fix, still festive.
- Gluten-free? Use a 1:1 gluten-free baking flour. It actually works (shockingly).
- Dairy-free? Swap butter for vegan butter and use plant milk for the icing. Flavor stays great—promise.
- Want peppermint vibes? Add a drop of peppermint extract to the icing and feel instantly jolly.
IMO, cookies are one of the easiest recipes to customize. As long as you don’t remove the sugar and butter (why??), you’re good.
FAQ (Frequently Asked Questions)
1. Can I use margarine instead of butter?
Technically yes, but… why hurt your soul like that?
2. Can I freeze the cookie dough?
Absolutely. Freeze the dough balls, then bake straight from the freezer. Add a minute or two to the bake time.
3. How long do these cookies stay fresh?
About 4–5 days in an airtight container—if they survive that long.
4. Can I make the icing thicker?
Yep! Add more powdered sugar until it feels like the right level of drama.
5. My icing is too thin. What do I do?
Add powdered sugar. Don’t panic. We’ve all been there.
6. Can I make these without a mixer?
Yes, if you have strong arms or unresolved anger to work through.
7. Do I have to chill the dough?
Nope. This recipe is low-drama and doesn’t require chilling.
Final Thoughts
There you go—your new go-to Festive Christmas Cookies with Green and White Icing that are cute enough to impress but simple enough to whip up on a random Tuesday night. Whether you’re baking for friends, family, coworkers, or just yourself (no judgment), these cookies deliver holiday magic with minimal effort.
Now go make a batch, blast some Christmas music, and pretend you’re in one of those holiday baking movies. You’ve earned it. 🎄🍪
Printable Recipe Card
Want just the essential recipe details without scrolling through the article? Get our printable recipe card with just the ingredients and instructions.