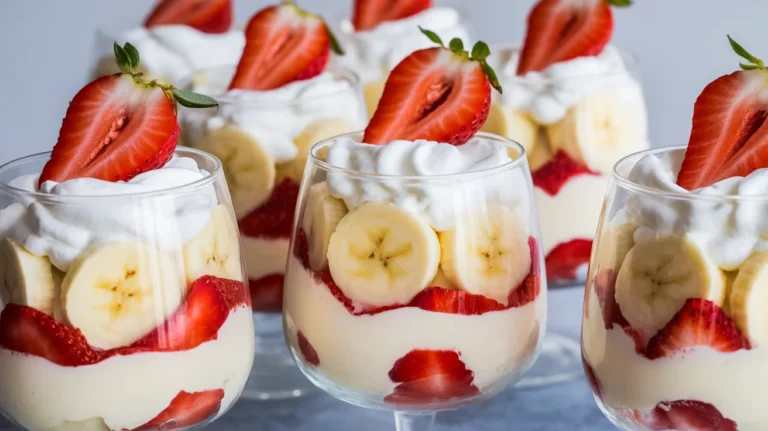
Creamy Strawberry Banana Pudding Dessert for Any Occasion – Simple, Fresh, and Crowd-Pleasing
This creamy strawberry banana pudding hits that perfect sweet spot between nostalgic and fresh. It’s layered with velvety vanilla pudding, ripe bananas, juicy strawberries, and soft vanilla wafers for a dessert that feels familiar yet special. It comes together quickly with a few shortcuts, but still tastes homemade.
Make it for holidays, barbecues, baby showers, or a quiet night in—you’ll get compliments either way.

Creamy Strawberry Banana Pudding Dessert for Any Occasion – Simple, Fresh, and Crowd-Pleasing
Ingredients
- Vanilla pudding mix (two 3.4 oz boxes) or homemade vanilla pudding
- Cold milk (per pudding package instructions; usually about 4 cups total)
- Heavy whipping cream (1 1/2 cups) or prepared whipped topping (about 3 cups)
- Powdered sugar (2–3 tablespoons, if whipping cream)
- Vanilla extract (1 teaspoon)
- Ripe bananas (3–4 medium), sliced
- Fresh strawberries (1 1/2 to 2 pounds), hulled and sliced
- Vanilla wafers (about 1 box, 11–12 oz)
- Cream cheese (optional, 4 oz softened) for extra richness
- Lemon juice (1 tablespoon) to toss with bananas and slow browning
- Strawberry jam (optional, 2–3 tablespoons) for a light swirl
- Pinch of salt to balance sweetness
Instructions
- Whip the cream. In a cold bowl, beat the heavy cream with powdered sugar and vanilla until soft peaks form. Don’t overwhip. If using whipped topping, skip this step.
- Make the pudding. Prepare the vanilla pudding according to package directions with cold milk. Let it thicken in the fridge for 5–10 minutes.
- Optional cream cheese layer. Beat the softened cream cheese with a pinch of salt until smooth. Fold in half of the whipped cream to create a light, tangy base.
- Prep the fruit. Slice strawberries and bananas. Toss banana slices with lemon juice to reduce browning, then pat dry with a paper towel so the layers don’t get watery.
- Combine the creams. Fold the remaining whipped cream into the chilled pudding to create a light, airy texture. Taste and adjust sweetness if needed.
- Start layering. In a 9×13-inch dish or a large trifle bowl, add a single layer of vanilla wafers. Top with the cream cheese mixture (if using) or a thin layer of the pudding-cream blend.
- Add fruit. Arrange a layer of bananas and strawberries over the cream. If you like, warm the strawberry jam slightly and drizzle a thin ribbon for extra berry flavor.
- Repeat. Add another layer of wafers, then more pudding-cream, then more fruit. Aim for 2–3 complete layers, finishing with the pudding-cream on top.
- Top and chill. Garnish with crushed wafers and a few strawberry slices. Cover and chill for at least 3 hours (overnight is best) to let the wafers soften and flavors meld.
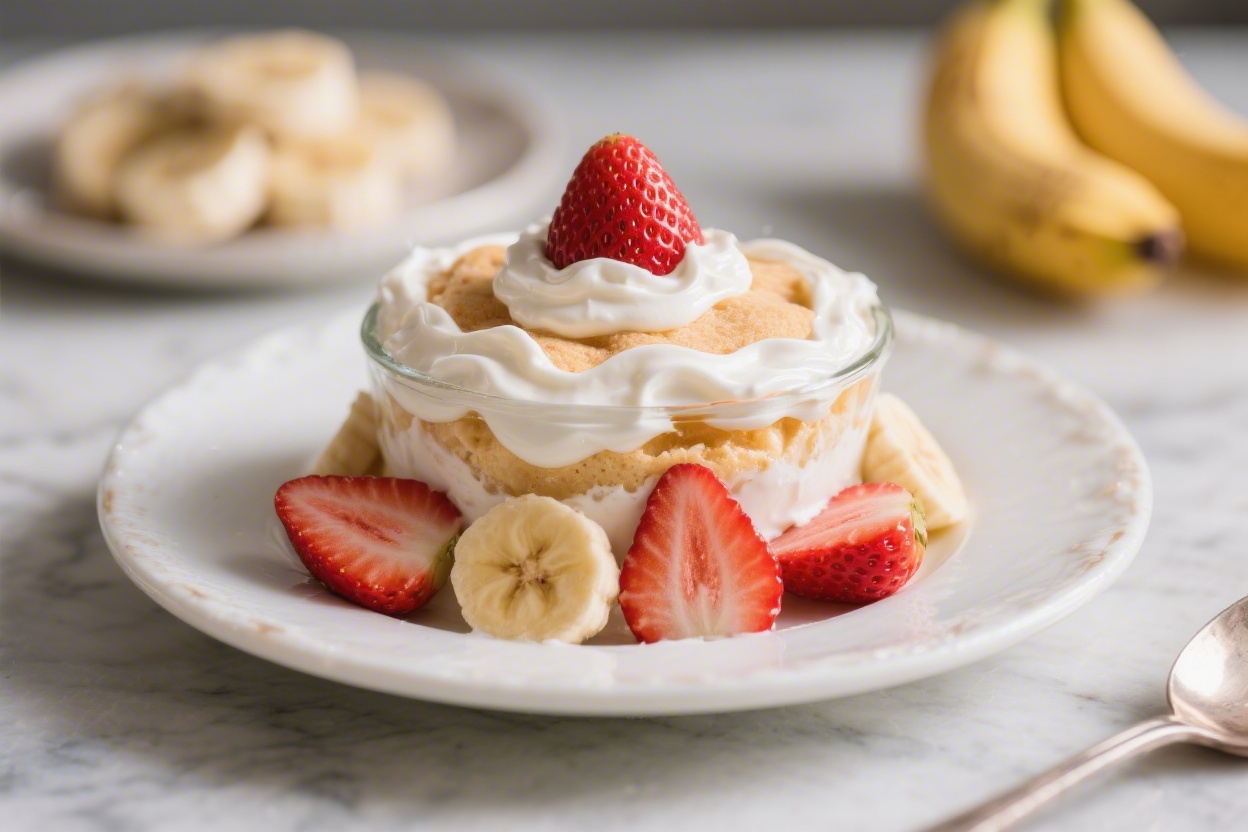
- Serve. Spoon into bowls or slice like a soft cake. Add extra fresh berries on top right before serving for a pop of color.
Why This Recipe Works
This dessert blends classic banana pudding with a bright strawberry twist. The berries cut through the richness, keeping each bite light and balanced. Layering creates contrast: crisp-tender wafers, silky pudding, and fresh fruit all in one spoonful.
Using a whipped cream and pudding combo gives you that cloud-like texture without any fuss. Plus, it’s make-ahead friendly, which means less stress and better flavor as it chills.
What You’ll Need
- Vanilla pudding mix (two 3.4 oz boxes) or homemade vanilla pudding
- Cold milk (per pudding package instructions; usually about 4 cups total)
- Heavy whipping cream (1 1/2 cups) or prepared whipped topping (about 3 cups)
- Powdered sugar (2–3 tablespoons, if whipping cream)
- Vanilla extract (1 teaspoon)
- Ripe bananas (3–4 medium), sliced
- Fresh strawberries (1 1/2 to 2 pounds), hulled and sliced
- Vanilla wafers (about 1 box, 11–12 oz)
- Cream cheese (optional, 4 oz softened) for extra richness
- Lemon juice (1 tablespoon) to toss with bananas and slow browning
- Strawberry jam (optional, 2–3 tablespoons) for a light swirl
- Pinch of salt to balance sweetness
How to Make It
- Whip the cream. In a cold bowl, beat the heavy cream with powdered sugar and vanilla until soft peaks form. Don’t overwhip.
If using whipped topping, skip this step.
- Make the pudding. Prepare the vanilla pudding according to package directions with cold milk. Let it thicken in the fridge for 5–10 minutes.
- Optional cream cheese layer. Beat the softened cream cheese with a pinch of salt until smooth. Fold in half of the whipped cream to create a light, tangy base.
- Prep the fruit. Slice strawberries and bananas.
Toss banana slices with lemon juice to reduce browning, then pat dry with a paper towel so the layers don’t get watery.
- Combine the creams. Fold the remaining whipped cream into the chilled pudding to create a light, airy texture. Taste and adjust sweetness if needed.
- Start layering. In a 9×13-inch dish or a large trifle bowl, add a single layer of vanilla wafers. Top with the cream cheese mixture (if using) or a thin layer of the pudding-cream blend.
- Add fruit. Arrange a layer of bananas and strawberries over the cream.
If you like, warm the strawberry jam slightly and drizzle a thin ribbon for extra berry flavor.
- Repeat. Add another layer of wafers, then more pudding-cream, then more fruit. Aim for 2–3 complete layers, finishing with the pudding-cream on top.
- Top and chill. Garnish with crushed wafers and a few strawberry slices. Cover and chill for at least 3 hours (overnight is best) to let the wafers soften and flavors meld.
- Serve. Spoon into bowls or slice like a soft cake.
Add extra fresh berries on top right before serving for a pop of color.
How to Store
Cover tightly and refrigerate for up to 3 days. The bananas will gradually darken, but the flavor stays lovely. For the freshest look, add a layer of sliced strawberries on top right before serving and tuck banana slices into inner layers instead of the very top.
Avoid freezing; the texture of the pudding and fruit won’t hold up well after thawing.
Health Benefits
- Strawberries and bananas bring fiber, vitamin C, potassium, and antioxidants to support heart health and immunity.
- Calcium from milk and cream helps maintain strong bones and teeth.
- Customizable sugar levels: You can choose reduced-sugar pudding or cut back on added sweeteners to make it lighter.
- Portion-friendly: Because it’s rich, a small serving satisfies a sweet craving while keeping portions in check.
Pitfalls to Watch Out For
- Watery layers: Don’t add wet fruit directly from rinsing; pat strawberries dry. Toss bananas with lemon juice and blot lightly.
- Runny pudding: Use cold milk and give the pudding enough time to thicken before layering.
- Soggy wafers too soon: If serving the same day, chill for at least a few hours. For firmer texture, add a thin layer of pudding over wafers before fruit.
- Overwhipped cream: Stop at soft peaks.
Grainy or stiff cream won’t fold smoothly into pudding.
- Overly sweet: Taste as you go. Strawberries vary in sweetness, so you may not need extra sugar or jam.
Alternatives
- Cookies: Swap vanilla wafers for shortbread, graham crackers, ladyfingers, or butter cookies.
- Pudding flavors: Try banana, cheesecake, or white chocolate pudding for a twist.
- Dairy-free: Use dairy-free pudding mix prepared with almond, oat, or coconut milk, and coconut whipped cream.
- No-cream version: Use just pudding for a lighter dessert, or Greek yogurt folded into pudding for tang and protein.
- Berry switch: Add blueberries or raspberries, or make a triple-berry version if strawberries are out of season.
- Crunch factor: Sprinkle toasted coconut, chopped pistachios, or almonds on top right before serving.
FAQ
Can I make this a day ahead?
Yes. In fact, it tastes better after chilling overnight.
The wafers soften into a cake-like texture, and the flavors come together nicely. Just wait to add any final fresh fruit garnish until serving time.
How do I keep the bananas from turning brown?
Toss banana slices with a little lemon juice and gently pat them dry. Tucking them into inner layers rather than on top also helps.
If you’re serving on day three, consider replacing top-layer bananas with strawberries only.
Can I use homemade pudding?
Absolutely. A rich stovetop vanilla pudding works beautifully. Let it cool fully, then fold in whipped cream for that airy, mousse-like texture.
What dish should I use?
A 9×13-inch baking dish is practical and easy to serve from.
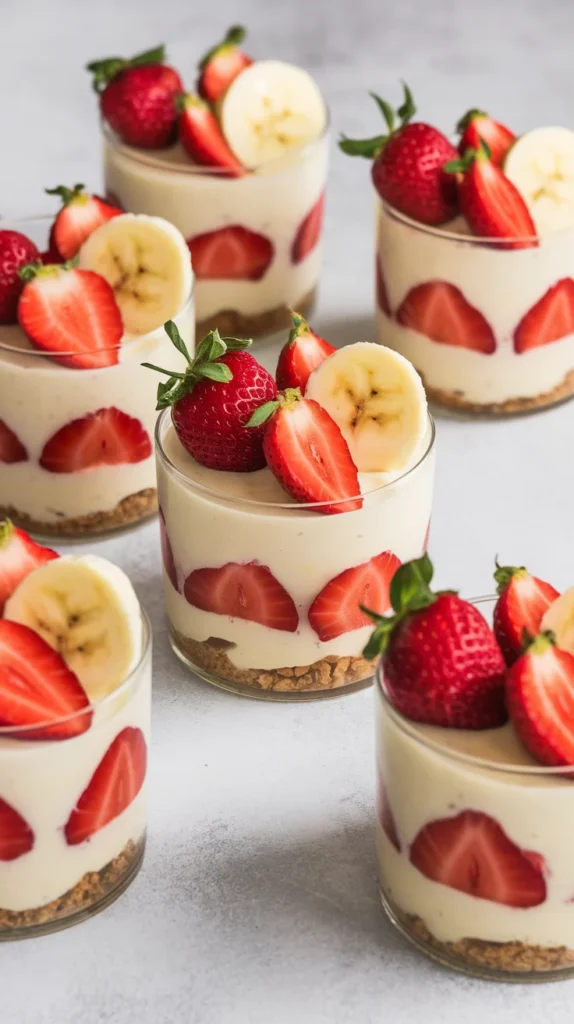
A trifle bowl looks impressive for parties and shows off the layers. Individual mason jars also work well for portion control and grab-and-go servings.
Is this dessert very sweet?
It’s sweet, but you can control it. Use less powdered sugar in the whipped cream, choose unsweetened or reduced-sugar pudding, and skip the jam swirl if your strawberries are very ripe.
Can I make it gluten-free?
Yes.
Use gluten-free vanilla wafers or ladyfingers. Check that your pudding mix is gluten-free and prepare with a suitable milk alternative if needed.
What if my pudding is too thin?
Chill it longer to set. If it’s still loose, fold in a bit more whipped cream or a spoonful of softened cream cheese to help stabilize the mixture.
Next time, whisk with colder milk and follow the package ratio closely.
How long can it sit out at a party?
About 1–2 hours, depending on room temperature. Keep it on a chilled tray if possible and return leftovers to the fridge promptly to maintain texture and food safety.
Can I add a layer of jam or compote?
Yes. A thin layer of strawberry jam or quick strawberry compote adds extra berry flavor.
Keep it light to avoid soggy layers and intense sweetness.
What’s the best way to cut clean slices?
Chill overnight, then use a long, sharp knife or a flat spatula. Wiping the blade between cuts helps keep layers neat.
Final Thoughts
This creamy strawberry banana pudding dessert is simple, flexible, and always a hit. It looks pretty in layers, tastes luxurious without being heavy, and uses ingredients you can find year-round.
Whether you bring it to a potluck or make it for a quiet family dessert, it’s the kind of recipe you’ll keep coming back to. Keep it classic, or customize it with your favorite cookies, dairy-free swaps, or extra berries—either way, you’ll have a sweet, crowd-pleasing finish every time.
Printable Recipe Card
Want just the essential recipe details without scrolling through the article? Get our printable recipe card with just the ingredients and instructions.