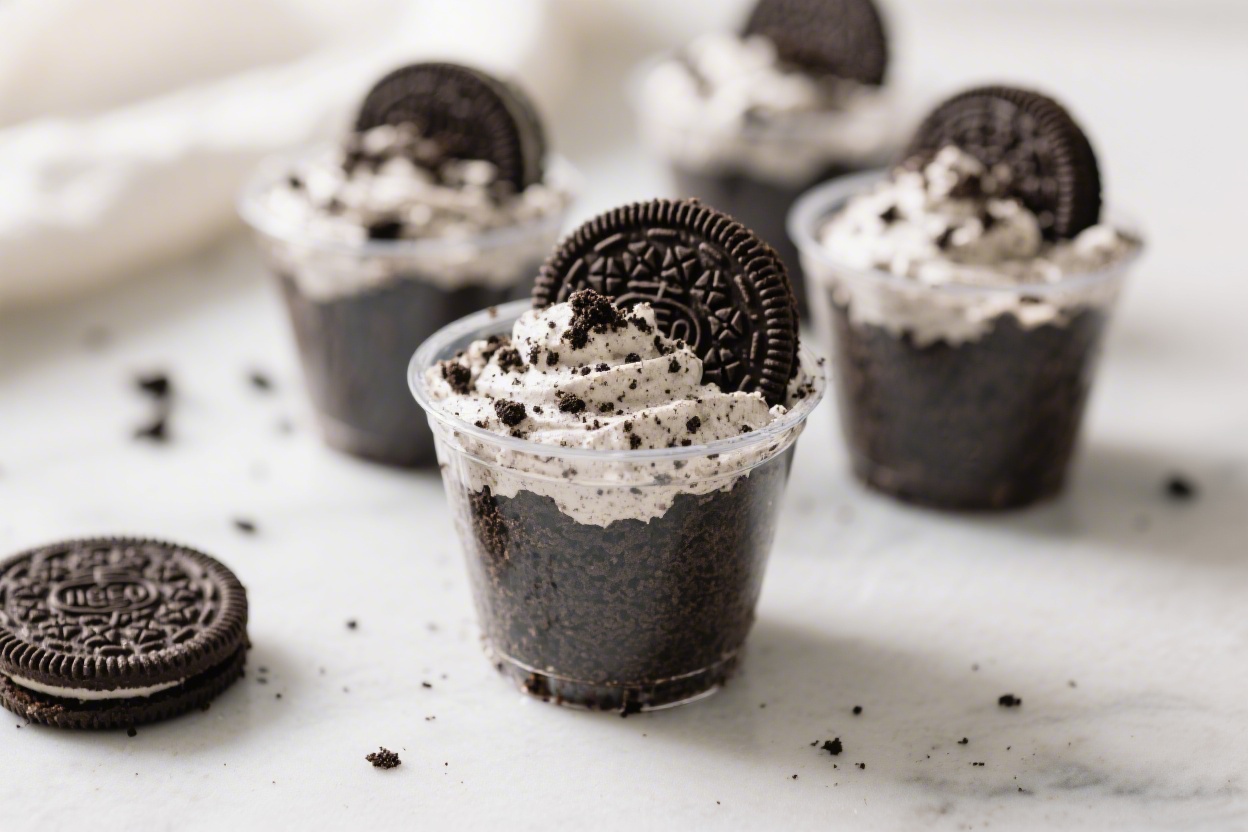
No-Bake Oreo Dirt Cups You Can Make in 10 Minutes – Fast, Fun, and Delicious
If you need a quick dessert that looks cute and tastes amazing, these no-bake Oreo dirt cups are a winner. They come together fast, use everyday ingredients, and require zero baking or special equipment. Kids love the “dirt” look, and adults appreciate how rich and creamy they are.
Whether you’re making a last-minute treat for guests or a fun activity for the family, this recipe delivers sweet results in minutes.

No-Bake Oreo Dirt Cups You Can Make in 10 Minutes – Fast, Fun, and Delicious
Ingredients
- Oreos: About 24 cookies for the base and topping (regular or Double Stuf both work).
- Instant chocolate pudding mix: Two 3.4-ounce boxes or one 5.9-ounce family-size box.
- Cold milk: 3 1/2 to 4 cups, depending on your pudding package directions.
- Whipped topping (like Cool Whip): 8 ounces, thawed.
- Cream cheese: 4 ounces, softened (optional for extra richness).
- Powdered sugar: 1/4 cup (optional, if using cream cheese).
- Vanilla extract: 1 teaspoon (optional).
- Gummy worms: A handful for decorating.
- Clear cups or small jars: 8 to 10, depending on size.
Instructions
- Crush the Oreos: Place the cookies in a zip-top bag and crush with a rolling pin until you have fine crumbs with a few small chunks. Set aside. You can also pulse them in a food processor.
- Make the pudding: In a large bowl, whisk the instant pudding mix with cold milk for about 2 minutes until thick and smooth. Let it sit for a minute to set.
- Optional cream cheese layer: If using, beat the softened cream cheese, powdered sugar, and vanilla until smooth. Fold in half of the whipped topping until creamy.
- Fold in whipped topping: Gently fold the remaining whipped topping into the pudding until combined and fluffy. If using the cream cheese mixture, you can layer it separately or fold it into the pudding for a thicker, mousse-like texture.
- Layer the cups: Spoon a tablespoon or two of crushed Oreos into the bottom of each cup. Add a layer of pudding mixture. Repeat with more Oreos and more pudding, ending with a final “dirt” layer of cookie crumbs on top.
- Decorate: Press a couple of gummy worms into the top layer. Add any extra decorations you like, such as chocolate rocks or a sprig of mint for “plants.”
- Serve or chill: These are ready to eat right away, but they’re even better after 20–30 minutes in the fridge. The layers settle, and the flavors meld.
Why This Recipe Works
This dessert nails the balance between creamy, chocolatey, and crunchy. The crushed Oreos act as the “soil,” adding texture and a chocolate cookie punch. The pudding layer is smooth and rich, while the whipped topping keeps everything light.
Because it’s no-bake, there’s no waiting on the oven or worrying about timing. It’s also easy to customize with toppings and flavors, so you can make it your own without stress.
What You’ll Need
- Oreos: About 24 cookies for the base and topping (regular or Double Stuf both work).
- Instant chocolate pudding mix: Two 3.4-ounce boxes or one 5.9-ounce family-size box.
- Cold milk: 3 1/2 to 4 cups, depending on your pudding package directions.
- Whipped topping (like Cool Whip): 8 ounces, thawed.
- Cream cheese: 4 ounces, softened (optional for extra richness).
- Powdered sugar: 1/4 cup (optional, if using cream cheese).
- Vanilla extract: 1 teaspoon (optional).
- Gummy worms: A handful for decorating.
- Clear cups or small jars: 8 to 10, depending on size.
How to Make It
- Crush the Oreos: Place the cookies in a zip-top bag and crush with a rolling pin until you have fine crumbs with a few small chunks. Set aside.
You can also pulse them in a food processor.
- Make the pudding: In a large bowl, whisk the instant pudding mix with cold milk for about 2 minutes until thick and smooth. Let it sit for a minute to set.
- Optional cream cheese layer: If using, beat the softened cream cheese, powdered sugar, and vanilla until smooth. Fold in half of the whipped topping until creamy.
- Fold in whipped topping: Gently fold the remaining whipped topping into the pudding until combined and fluffy.
If using the cream cheese mixture, you can layer it separately or fold it into the pudding for a thicker, mousse-like texture.
- Layer the cups: Spoon a tablespoon or two of crushed Oreos into the bottom of each cup. Add a layer of pudding mixture. Repeat with more Oreos and more pudding, ending with a final “dirt” layer of cookie crumbs on top.
- Decorate: Press a couple of gummy worms into the top layer.
Add any extra decorations you like, such as chocolate rocks or a sprig of mint for “plants.”
- Serve or chill: These are ready to eat right away, but they’re even better after 20–30 minutes in the fridge. The layers settle, and the flavors meld.
How to Store
Cover each cup with plastic wrap or store them in an airtight container. Keep them in the refrigerator for up to 3 days.
The cookie crumb topping will soften slightly over time, so if you prefer a crunchier finish, reserve some crumbs and add them right before serving. Avoid freezing; the texture of the pudding and whipped topping can turn icy and grainy.
Health Benefits
These cups are a treat, but you can still make choices that feel better for you. Using reduced-fat milk and a light whipped topping can trim some calories and saturated fat.
If you want less sugar, try a sugar-free instant pudding mix, or cut back on the powdered sugar if you use the cream cheese layer.
You can also balance your dessert by serving mini portions in small cups. It lets you enjoy the flavor and fun without going overboard. And if you want a small nutritional boost, stir a spoonful of Greek yogurt into the pudding for extra protein and tang.
What Not to Do
- Don’t use warm milk for the pudding.
It won’t set properly and will stay runny.
- Don’t over-crush the Oreos into total dust. A few small chunks keep the texture interesting.
- Don’t skip thawing the whipped topping. If it’s too cold, it won’t fold in smoothly and can leave lumps.
- Don’t assemble too early if you need maximum crunch.
The cookie layer softens in the fridge.
- Don’t overload the cups with gummy worms on top. A few look cute; too many sink and make the top messy.
Recipe Variations
- Mint Garden: Use mint Oreos, add a drop of peppermint extract to the pudding, and garnish with fresh mint leaves.
- Peanut Butter Patch: Whisk 2–3 tablespoons of creamy peanut butter into the pudding. Top with chopped peanut butter cups.
- Cookies and Cream Cheesecake Cups: Keep the cream cheese layer separate and alternate it with pudding for a thicker, cheesecake-like bite.
- Mocha Mud: Add 1 teaspoon of instant espresso powder to the pudding for a coffee-chocolate kick.
- Gluten-Friendly Option: Use certified gluten-free sandwich cookies and ensure your pudding mix is gluten-free.
- Halloween Graveyard: Stick a cookie “tombstone” on top and pipe “RIP” with melted chocolate.
Add candy pumpkins.
- Berry Patch: Fold chopped strawberries or raspberries into the pudding for a fruity twist.
- High-Protein Boost: Swap some milk for vanilla protein shake and fold in Greek yogurt for extra creaminess.
FAQ
Can I make these dirt cups a day ahead?
Yes. Assemble them up to 24 hours ahead and keep them covered in the fridge. For the best texture, save a small handful of Oreo crumbs and sprinkle them on just before serving.
What size cups should I use?
Four- to eight-ounce clear cups work well.
If you’re making party snacks, go smaller for mini portions. For a dessert-style serving, use 8-ounce jars or tumblers.
Can I use homemade whipped cream instead of whipped topping?
Absolutely. Whip 1 cup of cold heavy cream with 2 tablespoons of powdered sugar until medium peaks form.
Fold it into the pudding gently. Note that homemade whipped cream can deflate a bit faster, so serve within a day for the best texture.
Do I need the cream cheese layer?
No. It’s optional.
The cream cheese makes the filling richer and thicker, but the pudding-and-whipped-topping combo is delicious on its own and a little lighter.
How many dirt cups does this recipe make?
It typically makes 8–10 small cups or 6 larger cups, depending on how much you layer and your cup size. If you’re feeding a crowd, it’s easy to double.
What if my pudding is too runny?
First, give it a few extra minutes to set. If it still seems thin, it’s often due to warm milk or not whisking long enough.
You can fold in a bit more whipped topping or chill the mixture for 10–15 minutes to help it thicken.
Can I make this without dairy?
Yes. Use a dairy-free instant pudding that sets with non-dairy milk, and choose a dairy-free whipped topping. Check your cookie brand to confirm it fits your needs.
What can I use instead of Oreos?
Chocolate sandwich cookies work well, or try chocolate graham crackers.
For a different flavor, use Biscoff cookies or vanilla wafers and pair with vanilla pudding.
How do I keep the layers neat?
Use a small spoon or transfer the pudding to a zip-top bag, snip the corner, and pipe the layers into the cups. Tap the cup gently on the counter to settle each layer before adding the next.
Can kids help with this recipe?
Definitely. Kids can crush cookies, whisk pudding, and add gummy worms.
Just handle any electric mixers or sharp tools yourself and supervise the layering.
In Conclusion
No-bake Oreo dirt cups are fast, forgiving, and fun to assemble. In just 10 minutes, you get a creamy, chocolatey treat with playful “dirt” and wiggly worms on top. Keep the ingredients on hand for last-minute desserts, and mix in the variations when you want to change things up.
Simple, crowd-pleasing, and no oven required—this one’s an easy keeper.
Printable Recipe Card
Want just the essential recipe details without scrolling through the article? Get our printable recipe card with just the ingredients and instructions.