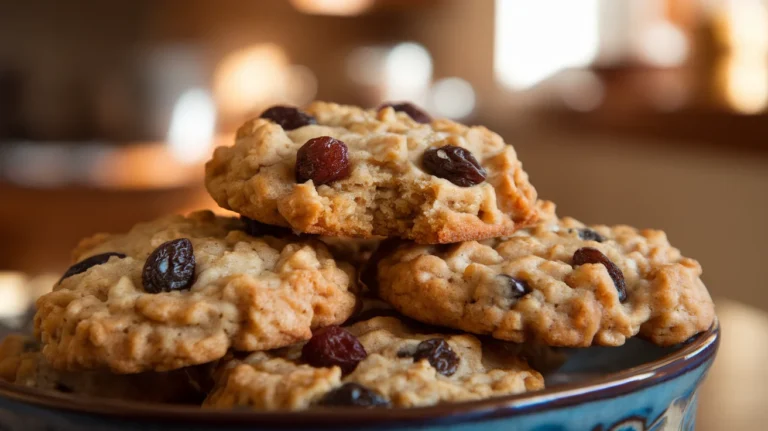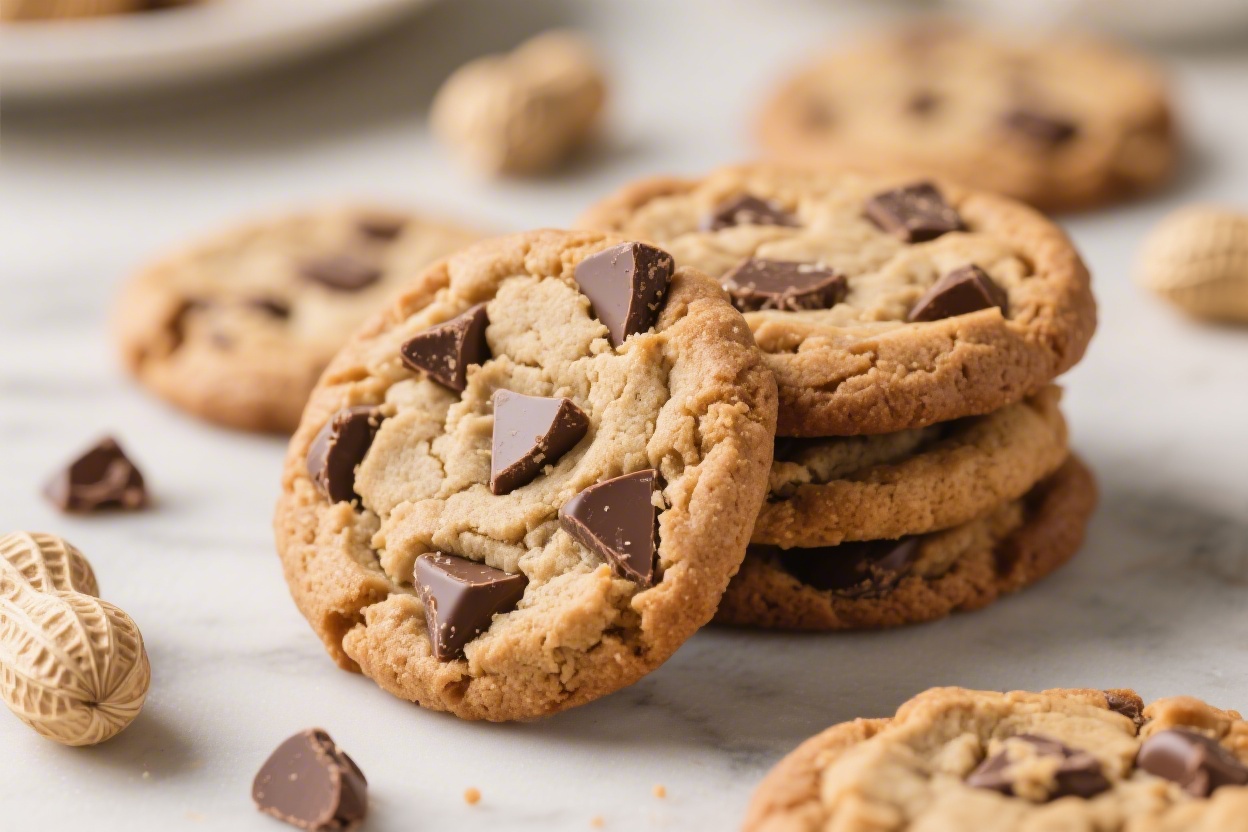
Ultimate Peanut Butter Chocolate Chunk Cookies for Dessert Lovers – Big Flavor, Easy Bake
Peanut butter and chocolate are a classic pair for a reason. These cookies are soft in the middle, crisp at the edges, and packed with rich, melty chocolate chunks. They’re the kind you make once and immediately bookmark for every party, bake sale, and late-night craving.
No tricky steps, no fancy equipment—just a straightforward recipe that turns out incredible results. If you love bold peanut butter flavor and generous pockets of chocolate, you’re in the right place.

Ultimate Peanut Butter Chocolate Chunk Cookies for Dessert Lovers - Big Flavor, Easy Bake
Ingredients
- 1/2 cup (113 g) unsalted butter, softened
- 1 cup (250 g) creamy peanut butter (not natural; use a no-stir brand for best texture)
- 3/4 cup (150 g) granulated sugar
- 1/2 cup (100 g) light brown sugar, packed
- 1 large egg + 1 large egg yolk, room temperature
- 2 teaspoons pure vanilla extract
- 1 1/2 cups (190 g) all-purpose flour
- 1 teaspoon baking soda
- 1/2 teaspoon baking powder
- 1/2 teaspoon fine salt
- 6 ounces (170 g) dark or semisweet chocolate chunks (or chop a bar)
- Optional: Flaky sea salt for finishing
Instructions
- Prep the basics: Line two baking sheets with parchment. Set butter and eggs out to warm slightly. Preheat the oven to 350°F (175°C) if baking right away.
- Cream the fats and sugars: In a large bowl, beat the butter, peanut butter, granulated sugar, and brown sugar on medium speed for 2–3 minutes, until fluffy and lighter in color.
- Add eggs and vanilla: Mix in the egg, then the extra yolk, followed by the vanilla. Beat until smooth and glossy, about 30 seconds.
- Whisk dry ingredients: In a separate bowl, whisk the flour, baking soda, baking powder, and salt. This keeps leavening even and prevents clumps.
- Combine gently: Add the dry ingredients to the wet mixture. Mix on low just until no dry streaks remain. Do not overmix—stop as soon as the dough comes together.
- Fold in chocolate: Use a spatula to fold in the chocolate chunks, reserving a small handful for pressing on top before baking.
- Chill (crucial): Cover and chill the dough for 30–60 minutes. This firms the dough, prevents spreading, and deepens flavor.
- Portion the dough: Scoop into 2-tablespoon balls (about 40–45 g each). Space them at least 2 inches apart on the prepared sheets.
- Top and bake: Press a few extra chocolate chunks into the tops. Bake for 9–11 minutes until edges are set and centers look slightly underbaked. Rotate sheets halfway through for even baking.
- Finish and set: Immediately sprinkle with a pinch of flaky sea salt if you like. Let cookies cool on the sheet for 5 minutes, then transfer to a rack. They’ll firm up as they cool.
What Makes This Recipe So Good
- Texture perfection: Chewy centers with lightly crisp edges, thanks to the right balance of butter, sugars, and chill time.
- Serious peanut butter flavor: We use creamy peanut butter for a smooth, rich bite in every cookie.
- Chocolate chunks over chips: Chunks melt into pools and give you varied bites—some gooey, some solid—so each cookie feels special.
- Easy, reliable method: Simple steps, clear timing, and no special tools beyond a mixer and baking sheet.
- Freezer-friendly: Make dough balls now, bake fresh cookies any time you want them.
Ingredients
- 1/2 cup (113 g) unsalted butter, softened
- 1 cup (250 g) creamy peanut butter (not natural; use a no-stir brand for best texture)
- 3/4 cup (150 g) granulated sugar
- 1/2 cup (100 g) light brown sugar, packed
- 1 large egg + 1 large egg yolk, room temperature
- 2 teaspoons pure vanilla extract
- 1 1/2 cups (190 g) all-purpose flour
- 1 teaspoon baking soda
- 1/2 teaspoon baking powder
- 1/2 teaspoon fine salt
- 6 ounces (170 g) dark or semisweet chocolate chunks (or chop a bar)
- Optional: Flaky sea salt for finishing
How to Make It
- Prep the basics: Line two baking sheets with parchment. Set butter and eggs out to warm slightly.
Preheat the oven to 350°F (175°C) if baking right away.
- Cream the fats and sugars: In a large bowl, beat the butter, peanut butter, granulated sugar, and brown sugar on medium speed for 2–3 minutes, until fluffy and lighter in color.
- Add eggs and vanilla: Mix in the egg, then the extra yolk, followed by the vanilla. Beat until smooth and glossy, about 30 seconds.
- Whisk dry ingredients: In a separate bowl, whisk the flour, baking soda, baking powder, and salt. This keeps leavening even and prevents clumps.
- Combine gently: Add the dry ingredients to the wet mixture.
Mix on low just until no dry streaks remain. Do not overmix—stop as soon as the dough comes together.
- Fold in chocolate: Use a spatula to fold in the chocolate chunks, reserving a small handful for pressing on top before baking.
- Chill (crucial): Cover and chill the dough for 30–60 minutes. This firms the dough, prevents spreading, and deepens flavor.
- Portion the dough: Scoop into 2-tablespoon balls (about 40–45 g each).
Space them at least 2 inches apart on the prepared sheets.
- Top and bake: Press a few extra chocolate chunks into the tops. Bake for 9–11 minutes until edges are set and centers look slightly underbaked. Rotate sheets halfway through for even baking.
- Finish and set: Immediately sprinkle with a pinch of flaky sea salt if you like.
Let cookies cool on the sheet for 5 minutes, then transfer to a rack. They’ll firm up as they cool.
Keeping It Fresh
- Room temperature: Store in an airtight container for 3–4 days. Slip in a slice of bread to keep cookies soft.
- Freezing baked cookies: Freeze in a single layer, then move to a bag or container for up to 2 months.
Thaw at room temp or warm for 2–3 minutes at 300°F (150°C).
- Freezing dough balls: Scoop, freeze on a tray until solid, then store in a freezer bag for up to 3 months. Bake from frozen at 325–350°F (165–175°C) for 1–2 extra minutes.
Benefits of This Recipe
- Balanced sweetness: Dark chocolate and a touch of salt keep the cookies rich without being cloying.
- Foolproof texture: The extra yolk adds moisture and chew, while chill time controls spread.
- Make-ahead friendly: Dough rests well and bakes beautifully later, perfect for planning.
- Customizable: Easy to tweak with different chocolates or add-ins without compromising the base.
- Great for sharing: Bold flavors and bakery-style looks make these a crowd favorite.
Common Mistakes to Avoid
- Using natural peanut butter: The oil separation leads to greasy, flat cookies. Use a no-stir creamy brand.
- Skipping the chill: Warm dough spreads too much.
Even 30 minutes in the fridge makes a difference.
- Overbaking: Pull them when the centers look slightly soft. They finish setting on the sheet.
- Overmixing the dough: Too much mixing after adding flour makes tough cookies. Stop once combined.
- Measuring flour inaccurately: Scoop-and-level or weigh for best results.
Too much flour dries them out.
Recipe Variations
- Double Chocolate: Swap 2 tablespoons of flour for cocoa powder and use semisweet chunks for a richer base.
- Crunchy Peanut Twist: Use crunchy peanut butter and add 1/3 cup roasted, salted peanuts for extra texture.
- Sweet-Salty Pretzel: Fold in 1/2 cup crushed pretzels and finish with flaky salt.
- Peanut Butter Cup: Stir in chopped mini peanut butter cups along with the chocolate chunks.
- Gluten-Free: Use a 1:1 gluten-free flour blend with xanthan gum. Chill a full hour to help structure.
- Dairy-Free: Replace butter with a high-quality vegan butter stick and use dairy-free dark chocolate.
FAQ
Can I use natural peanut butter?
Natural peanut butter tends to separate and can make cookies spread and turn oily. For the most reliable texture, use a no-stir creamy peanut butter.
If you must use natural, stir it thoroughly and add 1–2 tablespoons extra flour, but expect a slightly different result.
What kind of chocolate is best?
Chopped dark or semisweet chocolate works beautifully. Bars cut into chunks create varied pockets of melted chocolate. If using chips, choose larger or “chunk” style for a similar effect.
Do I really need to chill the dough?
Yes, especially with peanut butter dough.
Chilling controls spread and improves flavor. Even a quick 30-minute chill helps, but 60 minutes gives the best shape and chew.
How do I know when they’re done?
Look for edges that are set and lightly golden, with centers still soft and slightly underdone. If the tops look dry and firm, you’ve gone too far.
Remember, they continue to set as they cool.
Can I make them smaller or larger?
Absolutely. For smaller cookies, use a 1-tablespoon scoop and bake 7–9 minutes. For bakery size, use 3 tablespoons and bake 11–13 minutes, watching closely near the end.
Why add an extra egg yolk?
The yolk brings richness and moisture without extra water from an additional egg white.
It helps create that tender, chewy center you want in a peanut butter cookie.
What if I don’t have brown sugar?
You can use all granulated sugar, but the cookies will be less chewy and have less depth. If possible, add 1 teaspoon molasses to mimic brown sugar’s moisture and flavor.
How can I get those pretty bakery-style tops?
Press a few chocolate chunks into the tops of the dough balls before baking. After baking, you can also “scoot” the edges with a round cutter to neaten the shape while they’re hot.
In Conclusion
These Ultimate Peanut Butter Chocolate Chunk Cookies check every box: bold flavor, soft-and-chewy texture, and easy steps that work every time.
With a short chill and quality chocolate, you’ll get bakery-level results at home. Keep a stash of dough balls in the freezer, and fresh, warm cookies are always just minutes away. If you’re a dessert lover, this is the peanut butter chocolate cookie you’ll come back to again and again.
Printable Recipe Card
Want just the essential recipe details without scrolling through the article? Get our printable recipe card with just the ingredients and instructions.